Building an electric fireplace wall might seem like a big project, but it’s something I’ve helped several homeowners with over the years. Whether you’re upgrading your living space or adding a touch of warmth and style, it’s a project that, with the right approach, can be both satisfying and rewarding. Let me walk you through the process step-by-step, answering common questions along the way.

Planning and Design
Determine Placement
Find a suitable location where the wall won’t interfere with windows, outlets, or existing furniture. Consider viewing angles, access to electricity, and how it fits with the overall room design. Look at natural lighting in the room to determine how it will impact the fireplace’s glow. Also, think about how much space the new feature wall will occupy and how it affects the room’s flow.
Measure Dimensions
Measure the height, width, and depth of the area. Double-check these measurements to ensure your fireplace insert fits perfectly and that the wall will be proportionate. Think about how the dimensions will look in relation to the existing room design, and make note of any obstacles such as light switches or vents that could affect the placement. Take your time with this step, it sets the tone for the entire project.
“Proper measurements and planning are critical to ensuring a smooth build process and a seamless fireplace installation,” says Jennifer Mason, a veteran DIY enthusiast and construction consultant.
Choose Fireplace Insert
Select a high-quality electric fireplace insert that suits your aesthetic and functional needs. “Choose a model with clear installation instructions and adjustable features to match your wall design,” suggests Mike Lewis, a home improvement expert.
Materials and Tools Needed
Materials
You’ll need a framing lumber, drywall, screws, nails, joint compound, and paint. If adding enhancements like a mantel or built-ins, gather materials for those as well.
Tools
Essential tools include a saw, drill, level, measuring tape, screwdrivers, and a utility knife. Safety gear like gloves and goggles is a must. Each tool has a purpose: the level ensures your framing is straight, the saw helps cut your lumber to size, and the drill fastens everything together securely. Don’t rush the preparation stage; having the right tools ready makes the build much smoother.
Building the Frame
Mark the Wall
Use a pencil and level to outline where the fireplace wall will go. Mark the dimensions and locations for studs and the fireplace insert. I recommend using chalk lines for more visibility during construction and measuring twice before marking to avoid errors. It’s better to be precise now than have to fix misalignments later.
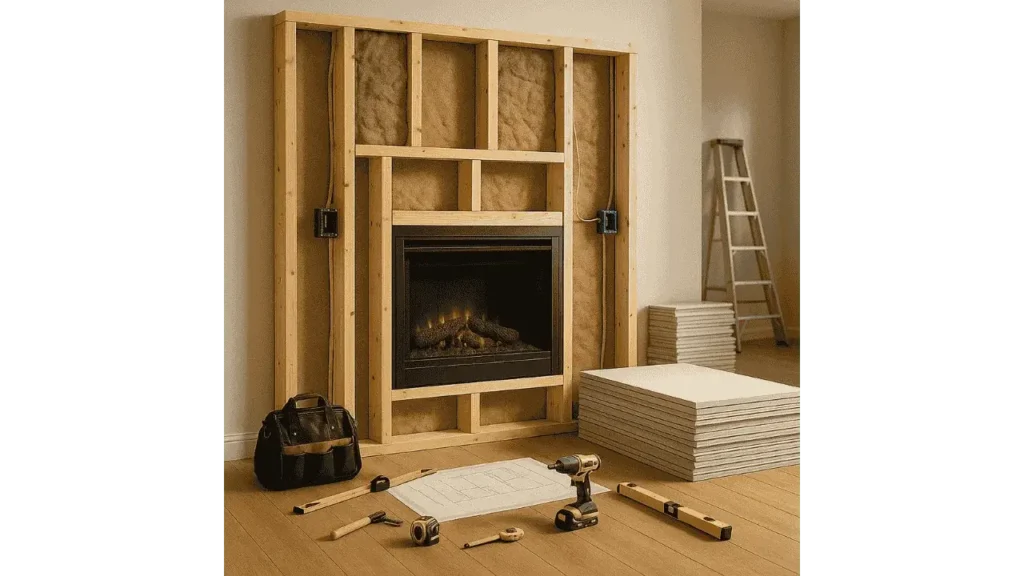
Construct the Frame
Build a sturdy frame using 2x4s, ensuring it’s level and square. Secure it to the existing wall and floor as needed.
“A well-built frame is the backbone of a fireplace wall,” says Sarah Blake, an interior designer with a background in home construction.
Create the Insert Opening
Measure and cut the opening for the fireplace insert within the frame. Double-check that the insert fits snugly.
Learn More: How to Install an Electric Fireplace Insert?
Installing the Fireplace Insert
Electrical Considerations
Run electrical wiring to the location of the fireplace, following local codes. If you’re not comfortable with this, hire a licensed electrician. Proper wiring ensures safety and efficiency, and you might also want to install a dedicated circuit to handle the fireplace’s power requirements. Always double-check connections before sealing the wall.
Insert Placement
Slide the fireplace insert into the opening and secure it according to the manufacturer’s instructions. Test the unit before closing up the frame.
Finishing the Wall
Drywall Installation
Attach drywall to the frame, cutting openings as needed for the insert. Secure with screws and ensure seams are tight. Consider pre-drilling holes in the studs to make screwing easier and reduce damage to the drywall. This extra step helps maintain a clean finish and prevents splitting.
Taping and Mudding
Apply joint tape and compound to cover seams and screw holes. Let it dry, then sand smooth for a clean finish. Apply multiple thin layers of compound for better results, allowing each coat to dry completely. Sand lightly between coats to avoid ridges and achieve a professional-looking surface.
Painting and Finishing Touches
Prime and paint the drywall to match your room’s decor. Add trim or moldings for a polished look. Choose a primer that suits the paint type for the best adhesion. Apply two coats of paint for a vibrant finish and consider adding accent moldings to tie the fireplace wall into the room’s overall aesthetic.
Optional Enhancements
Add a Mantel
Install a mantel above the fireplace for a classic touch. Choose materials that complement your room’s style. A well-chosen mantel can serve as a visual anchor for the room, tying together the entire design. Whether you prefer a rustic wood beam or a sleek modern design, make sure it’s proportionate to the fireplace and surrounding elements.
Incorporate Built-ins
Built-in shelves or cabinets on either side of the fireplace can add both storage and style. Consider customizing the built-ins with adjustable shelving or integrated lighting for a personalized touch. They not only enhance the functionality of the space but also contribute to a seamless design. Planning the layout ahead of time ensures they complement the overall aesthetic of the fireplace wall.
Mount a TV Above
If desired, mount a television above the fireplace, ensuring it’s at a comfortable viewing height and doesn’t interfere with the fireplace’s heat output. Double-check the TV’s height from seated positions in the room to avoid neck strain. Also, make sure there’s proper ventilation to prevent heat from damaging the electronics. It’s a great way to integrate entertainment with the cozy ambiance of the fireplace.
Conclusion
Building an electric fireplace wall transforms a room, adding both beauty and function. With careful planning, the right tools, and a step-by-step approach, you can create a stunning focal point that enhances your living space for many years.

- 27 Farmhouse Fireplace Ideas That Bring Warmth & Charm - August 18, 2025
- 25 Fireplace Lighting Ideas to Illuminate Your Hearth - August 7, 2025
- How to Replace an Electric Fireplace Switch? - August 5, 2025