Installing an electric fireplace in a wall is one of the best ways to achieve a sleek, built-in look while still enjoying the warmth and ambiance of a fire. It’s a process that involves careful planning, from framing to electrical work, but when done right, the results are worth it. I’ve installed units in both modern and traditional homes, and every time, the key has been precision and patience. With the right tools and steps, you can achieve a seamless fit that’s both safe and efficient. I’ve worked on several of these installations and can say with confidence that the planning stage is what makes or breaks the final outcome.

Planning and Preparation
Fireplace installer and construction specialist David Ellsworth explains,
“The biggest mistake people make is treating wall installation like plug-and-play; this is structural and electrical, and it needs the same care as any major fixture.”
Select Location and Firebox Size
Start by choosing a wall with enough clearance and structural support. The ideal height is typically eye level when seated, and the unit should be centered between studs if possible. Make sure the fireplace size fits the space and aligns well with nearby furniture or focal points.
Check Electrical Requirements
Most units require a nearby dedicated outlet, especially those with heater functions. Some models may also require hardwiring. Before starting, confirm your unit’s specifications and prepare to route power accordingly.
Gather Tools and Materials
You’ll need standard tools like a tape measure, level, stud finder, and drill. Also gather framing lumber, drywall, screws, electrical boxes, mounting brackets, and any wiring materials per your unit’s manual.
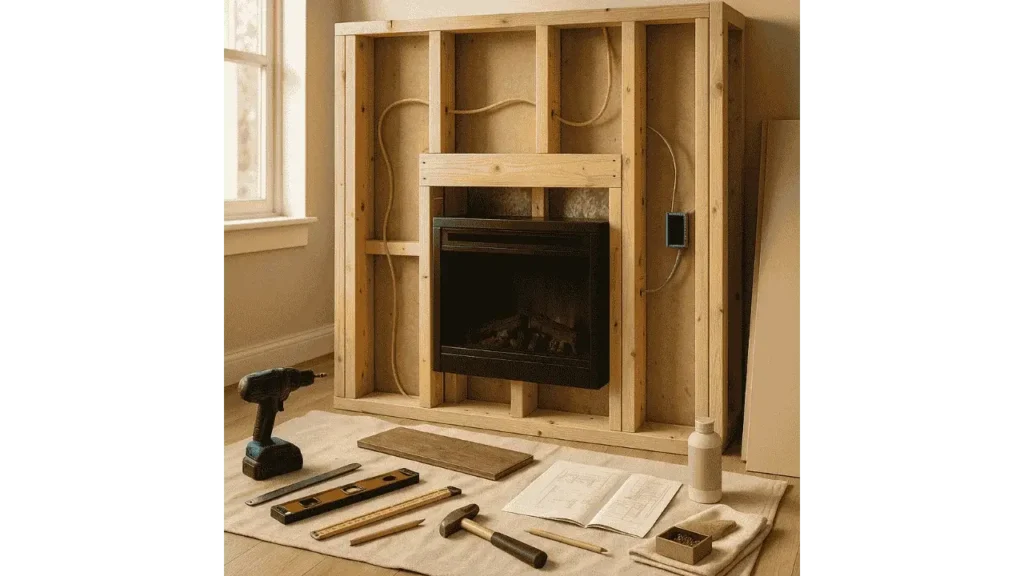
Framing the Wall Opening
Mark and Build Frame
Using the manufacturer’s cutout dimensions, mark the area for framing. Build a rectangular frame that fits snugly into the wall cavity, double-checking all measurements before cutting. Ensure the frame is level, flush with surrounding studs, and securely anchored to support the fireplace’s weight. A level foundation here prevents headaches later when installing the unit or trimming out the wall. Using the manufacturer’s cutout dimensions, mark the area for framing. Build a rectangular frame that fits snugly into the wall cavity. Ensure that it is level and securely anchored to studs to support the fireplace’s weight.
Account for Ventilation and Clearances
Most electric fireplaces require air circulation. Leave adequate space above, below, or around the unit as directed in the manual. This prevents overheating and protects your wall surfaces.
Electrical Setup
Install or Extend an Outlet
Add an outlet inside or just above the framed opening. If hardwiring is needed, hire a licensed electrician. Make sure wires are routed cleanly and remain accessible.
Ensure Compliance and Safety
Use a dedicated electrical circuit and ensure all wiring meets local electrical codes. This minimizes fire risk and ensures stable performance.
Installing the Fireplace Unit
Attach Mounting Brackets
Install L-brackets or the hardware provided by the manufacturer. These brackets must anchor to studs for stability and be positioned to match the unit’s support points.
Insert and Level Fireplace
Carefully slide the fireplace into the framed cavity. Secure the unit using the designated mounting points. Check for level and flush alignment with the wall surface.
Learn More: 31 Fireplace Tile Ideas
Finishing the Wall Surround
Install Drywall
Cut drywall sheets precisely to accommodate the fireplace insert, leaving room for airflow where needed. Use a drywall saw or utility knife for accuracy. Attach the sheets securely to the wall framing and ensure that all joints align cleanly with the structure. Smooth edges around the insert will help support any future trim or mantel additions. Cut drywall to fit around the fireplace insert and attach it to the framing. Ensure a clean edge around the unit to support any finishing trim.
Tape, Mud, Sand, and Paint
Finish drywall seams with joint compound, sand them smooth, then apply primer and paint to match the existing décor. This gives the installation a polished, professional look.
Add Trim or Mantel (Optional)
For added design, install trim or a mantel around the unit. Just make sure any materials used maintain proper clearances and don’t obstruct the fireplace vents.
Final Setup and Testing
Connect Power and Secure Faceplate
Plug the fireplace into the outlet or finish the hardwiring. Attach the front glass panel or cover. Use cord covers or route cables through the wall for a clean appearance.
Test Unit Functions
Power on the fireplace and test all functions: flame effects, heater, thermostat, and remote control. Make sure everything operates as expected before finalizing the space.
Safety Checks and Maintenance Tips
Electric systems expert Renee Keller advises,
“Always use a dedicated circuit for electric fireplaces, shared loads may not trip safely in the event of a fault.”
Monitor Ventilation and Heat
Always keep the ventilation zones around the fireplace free from obstruction. Periodically touch the surrounding wall to ensure it’s not overheating during use.
Routine Cleaning and Inspection
Dust the vents and glass faceplate regularly. Check cords or connections every few months to ensure everything remains safe and efficient.
Final Takeaways
Installing an electric fireplace in a wall creates a clean, built-in aesthetic that adds both comfort and value to your home. With proper planning, secure framing, code-compliant wiring, and attention to detail, the result will be both beautiful and safe. Always follow the manufacturer’s instructions, and when in doubt, especially with electrical work, consult a professional.

- 27 Farmhouse Fireplace Ideas That Bring Warmth & Charm - August 18, 2025
- 25 Fireplace Lighting Ideas to Illuminate Your Hearth - August 7, 2025
- How to Replace an Electric Fireplace Switch? - August 5, 2025