As a seasoned fireplace installation expert, I’ve learned that accurate measurements are the key to a seamless installation and avoiding costly mistakes. When you’re preparing to add an electric fireplace insert, getting the right dimensions isn’t just about aesthetics; it’s about safety, fit, and maximizing performance. With a precise approach and attention to detail, you’ll avoid returns, ensure proper airflow, and get that perfect built-in look every homeowner wants.

Essential Tools and Proper Setup
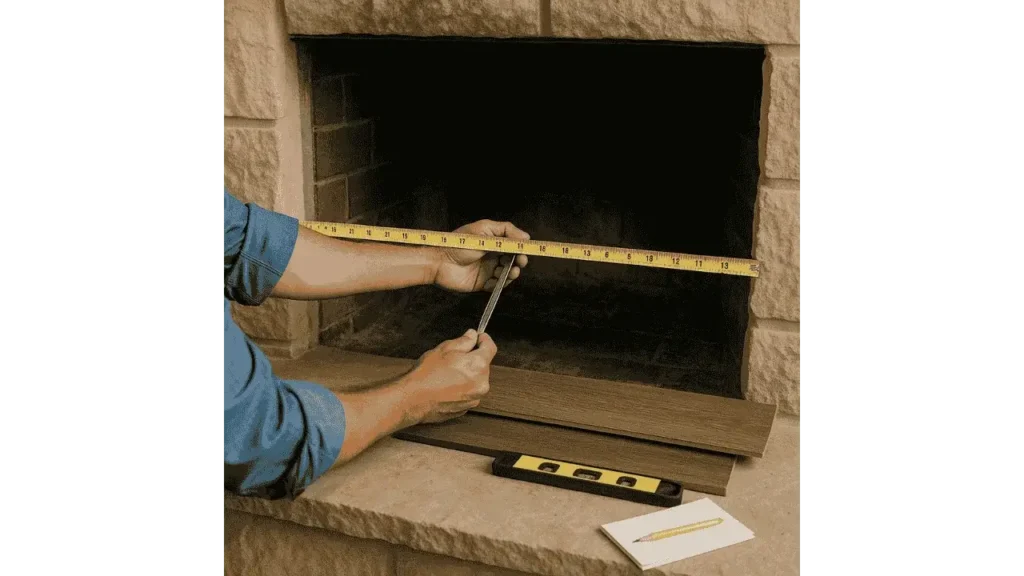
To begin measuring correctly, gather essential tools, including a tape measure, a carpenter’s level, and a notepad. The tape measure helps achieve exact dimensions, while the level ensures your measurements aren’t distorted by a slanted or uneven firebox. Recording everything immediately, even oddities or protrusions, saves you from double work. Small errors in this stage often turn into major installation headaches.
Measuring the Firebox Opening
Width
Start with the width by measuring from one side of the firebox to the other. Perform this measurement at both the very front and the back wall of the opening. Many fireplaces are narrower in the back, so base your planning on the smallest width measured. An insert that fits perfectly at the front but snags in the back is a common installation failure.
Read More: 31 Fireplace Mantel Replacement Ideas to Ignite Your Hearth!
Height
Measure the vertical distance from the firebox floor to the top edge. Take three measurements, at the left, center, and right. It’s not uncommon for the floor or the arch to slope slightly, so always record and use the lowest height to guarantee a clean fit without modification.
Depth
Now measure how deep the firebox is by checking from the back wall all the way to the front edge. Be sure to identify any inward extensions like a lintel bar or decorative stone. These intrusions reduce your usable depth, which is the number you’ll match with the insert’s dimensions.
Accounting for Installation Clearances
Clearance Requirements
Leave a minimum of 1 to 2 inches of space between the insert and the interior walls of the firebox on all sides. This ensures safe air circulation and prevents overheating. Skipping this allowance risks voiding warranties or triggering built-in safety shutoffs. Your insert must breathe to perform efficiently.
Irregular or Arched Openings
If your firebox features an arch or has an uneven shape, take multiple readings at various points along the curve or slope. Document the tightest height and width, since the insert must fit within those constraints. As Sandra Mitchell, an electric fireplace design consultant, notes,
“Always assume your firebox has imperfections. Measuring at multiple points is the only way to get a true fit.”
Considering Electrical and Surrounding Space
Outlet Placement
Check whether there’s a grounded electrical outlet inside the firebox or very close nearby. Note how long the power cord from your insert is, and make sure it reaches comfortably without tension or awkward positioning. Concealed power connections are best for aesthetics and safety.
Room Size and Heating Needs
Estimate how much heat output your space requires. A typical calculation is 20 BTU per square foot. For example, a 250 sq ft room would require an insert with approximately 5,000 BTU output. This ensures that your fireplace not only looks great but also provides meaningful warmth.
Cross‑Checking Manufacturer Specs
After recording all your measurements, compare them with the product’s stated width, height, and depth specifications. Don’t forget to factor in clearance requirements outlined in the user manual. Even a half-inch discrepancy can make installation difficult or unsafe.
Final Measurement Checklist in Context
Before you finalize your selection, double-check that you’ve measured the front width at its narrowest point, the rear width, and heights at multiple spots using the lowest reading. Confirm the firebox depth from the back wall to the front lip, while identifying the location of the electrical outlet and ensuring enough cord length. Finally, validate that you’ve left proper airflow clearance gaps on all sides, sides, top, and back. All of these details work together to confirm the right fit.
Installation Preparation Tips
If precision is a concern, especially in older homes where fireplaces may settle, consider using a laser distance measurer. It reduces guesswork and increases accuracy. Also, inspect the base of the firebox for levelness. A tilted base will prevent the insert from sitting flush, potentially compromising both appearance and performance.
“Measuring for an electric insert isn’t about rushing; it’s about precision. You get one shot to fit it right the first time,” says Greg Dalton, lead technician at HearthTech Installations.
Final Takeaways
Accurate measuring is the foundation of a safe and professional electric fireplace insert installation. Be thorough with width, height, depth, and electrical planning. Take time to review manufacturer specs, account for clearances, and test your fit with a checklist before you buy. A few extra minutes spent measuring now can save hours and hundreds of dollars later.

- 27 Farmhouse Fireplace Ideas That Bring Warmth & Charm - August 18, 2025
- 25 Fireplace Lighting Ideas to Illuminate Your Hearth - August 7, 2025
- How to Replace an Electric Fireplace Switch? - August 5, 2025